Installation

Apply a weather resistant barrier over sidewall sheathing. Note: some regions may require two layers of weather resistant barrier. Check local codes for more information.
Install Mortairvent® after windows and doors have been properly installed and flashed
Starting at the base of the wall, unroll Mortairvent® from right to left with the fabric flap on the bottom. The blue geomatrix should be facing the weather resistant barrier and the filter fabric facing the exterior of the building.
Staple or nail every three square feet.
On the bottom and top course only, fold the fabric flap and tuck it between the (blue) polymer matrix and the weather resistant barrier to create an insect screen. The top course roll will need to be inverted to achieve this.
On subsequent courses, butt the blue polymer material together without overlapping. Pull the fabric flap over the previous course (shingle style) and staple.
Apply lath, scratch coat, and stucco or masonry veneer siding over Mortairvent® using recommended fasteners and spacing.
Available in paintable white with pre-punched holes for easy installation.
Mortairvent® Weep Screed should be installed at the plate line, or stem wall, providing a stop for Stucco, EIFS, Stone, or Stone Veneers. A traditional siding or roofing nail can be used to install this product properly.
All exterior accessories shall be of PVC material conforming to ASTM D1784, C1063 and D4216. They shall be used where specified by the architect and installed per industry standards.
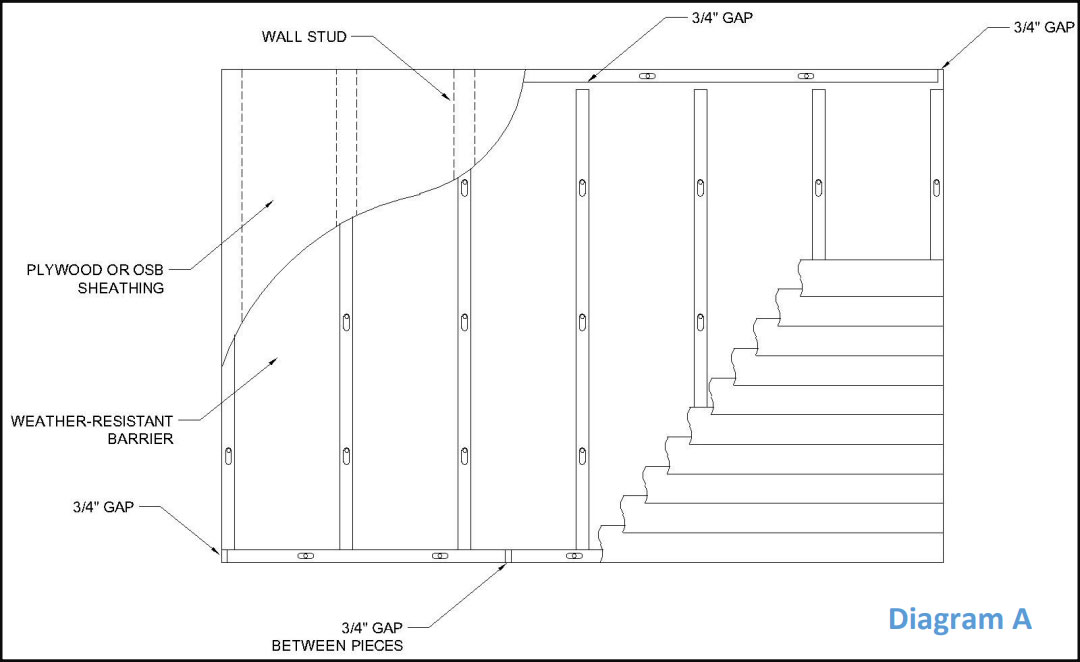
Installation over 1/2″ OSB or plywood intended for clapboard siding
- Install your weather resistant barrier (WRB) of choice over the surface area of the sheathing. Be sure to tape all seams.
- Place Watairvent® Furring Strip horizontally at the base of the wall around the entire perimeter (Diagram A, below) to prevent bugs from entering the channel.
- Place the Watairvent® Furring Strips vertically every sixteen inches on center aligned with the wood studs (Diagram A, below). Fasten the Furring Strip with either a 1.75″ nail or other approved fastener. It is important to penetrate the studs by at least a 1 1/4″. Per R703.15.2 of 2018 Intl. Residential Code. Can be installed horizontally as well.
Installation over 1″ insulation intended for clapboard siding
- Place the WRB of choice between the sheathing and rigid foam insulation. A drainable WRB is preferred.
- Place Watairvent® Furring Strips horizontally at the base of the wall around the entire perimeter to prevent bugs from entering the channel (Diagram A, below).
- Place the Watairvent® Furring Strips vertically every sixteen inches on center aligned with the wood studs. Be sure your fastener length accounts for the entire depth of the assembly. Follow siding manufacturers installation instructions. Can be installed horizontally as well.
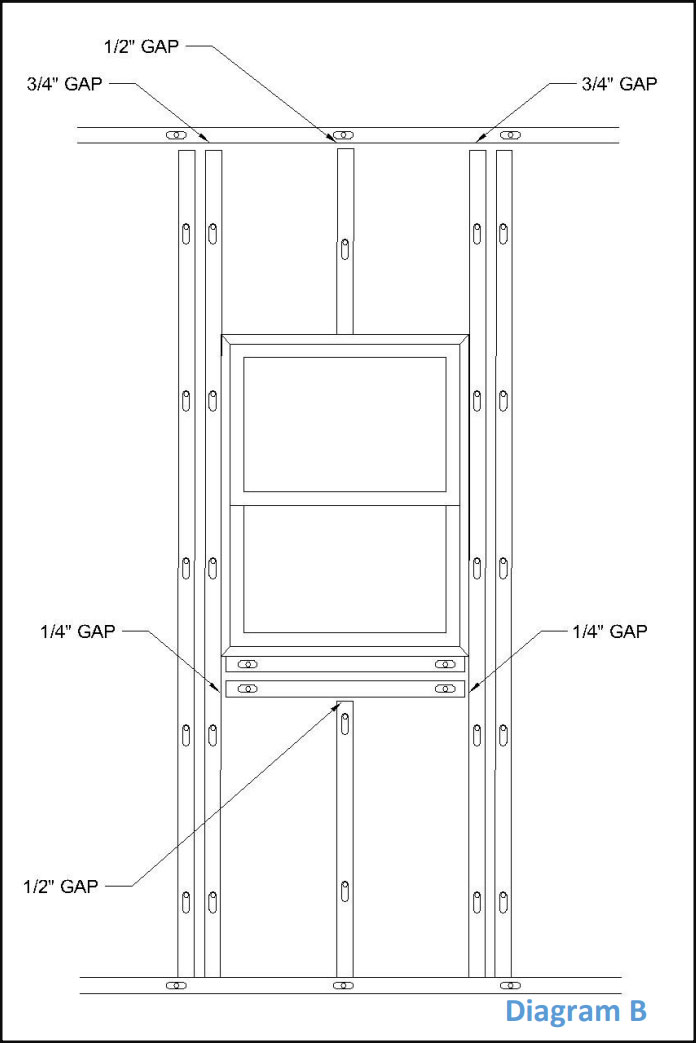
Installation at Windows and Trim
- Flash window per manufacturers recommendations.
- Additional Watairvent® Furring Strips should be installed behind vertical window trim and corner trim.
- Watairvent® Furring Strips should be installed directly up against the windows nailing flange (Diagram B, below).
- Leave necessary gaps for differential movement. (Diagram B, below).
- Trim windows and doors per manufacturers recommendations.
Installation at top of the wall
- Watairvent® Furring Strip can be installed horizontally at the top of the wall. Similar to the base of the wall whereas the furring strip will act as the bug screen and the airflow channels will remain free of debris.
- Leave a .75″ gap between vertical and horizontal furring strips to allow for differential movement (Diagram A, below).
Siding Installation
- Install all wood clapboards and cedar shakes per siding manufacturers recommendations.
Cutting Instructions
- Use a plywood blade installed backwards (often used for cutting vinyl siding) or cutting shears for best results.
Apply a water resistant barrier over sidewall sheeting. Check local building codes and specifications for more information.
Install Mortairvent® CW over installed rigid foam insulation board. Starting at the base of the wall unroll Mortairvent® CW from right to left between brick anchors with the three-dimensional (blue) polymer matrix side against the water resistant barrier and mortar deflection fabric facing exterior of building. Unroll the next course in the same manner as the first.
Be sure to always butt the blue polymer material together without overlapping.
Mortairvent® CW should be installed horizontally between brick ties as exterior brickwork is completed so as to maintain captivation within the brick anchoring system.
A. Install mortar deflection devices as part of masonry wall construction and in accordance with manufacturer’s installation instructions.
B. Install in cavities at [all through wall masonry flashings with weep holes.] [locations detailed on Drawings.]
C. Place deflection strips horizontally and diagonally directly on flashings.
A. Install mortar deflection devices as part of masonry wall construction and in accordance with manufacturer’s installation instructions.
B. Install in cavities at all through wall masonry flashings with weep holes.
[locations detailed on Drawings.]
C. Place deflection strips horizontally and diagonally directly on flashings.
A. Install mortar deflection devices as part of masonry wall construction and in accordance with manufacturer’s installation instructions.
B. Install in cavities at all through wall masonry flashings with weep holes. [locations detailed on Drawings.]
C. Place Mortar Catch® horizontally directly on the flashing.
A. Install mortar deflection devices as part of masonry wall construction and in accordance with manufacturer’s installation instructions.
B. Install in cavities at all through wall masonry flashings with weep holes.
[locations detailed on Drawings.]
C. Place deflection strips horizontally and diagonally directly on flashings
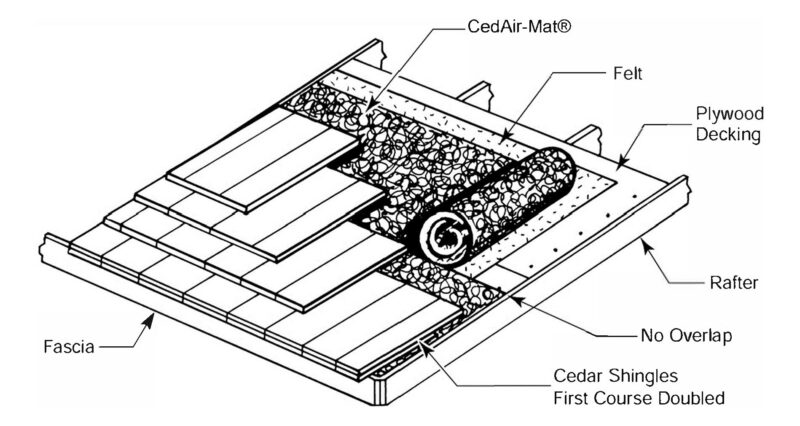
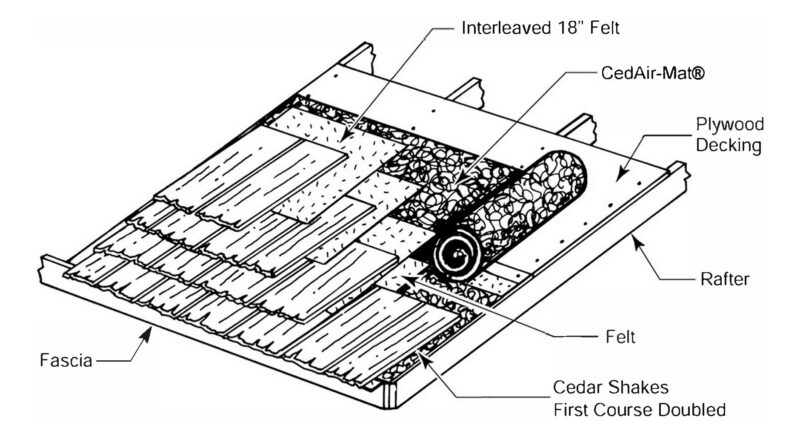
Install plywood roof sheathing onto rafters. Install roofing felt or ice dam protection membrane over sheathing. Check local codes and manufacturer’s recommendations for specific requirements.
Install CedAir-Mat® over roofing felt, ice protection membrane, and metal edge flashing or drip edge. Ensure CedAir-Mat® material is installed flush against edge of the flashing or drip edge. Carefully trim the CedAir-Mat® material at all penetrations with a utility knife or scissors.
When installing cedar or alternate material shingles, unroll CedAir-Mat® horizontally just ahead of the shingles as they are installed. Tack or nail CedAir-Mat® in place every three square feet. Do not overlap the CedAir-Mat® material. Butt each course tightly against the previous course and at vertical seams.
At ridge locations, extend CedAir-Mat® material over the ridge and butt against the material on the opposite side of the roof. If a ridge vent is utilized, follow the ridge vent manufacturer’s recommendations for underlayment material installation.
Apply roofing materials using manufacturer’s recommended fasteners and instructions, allowing for the additional 3/8″ thickness of the CedAir-Mat® material.


Recommendations
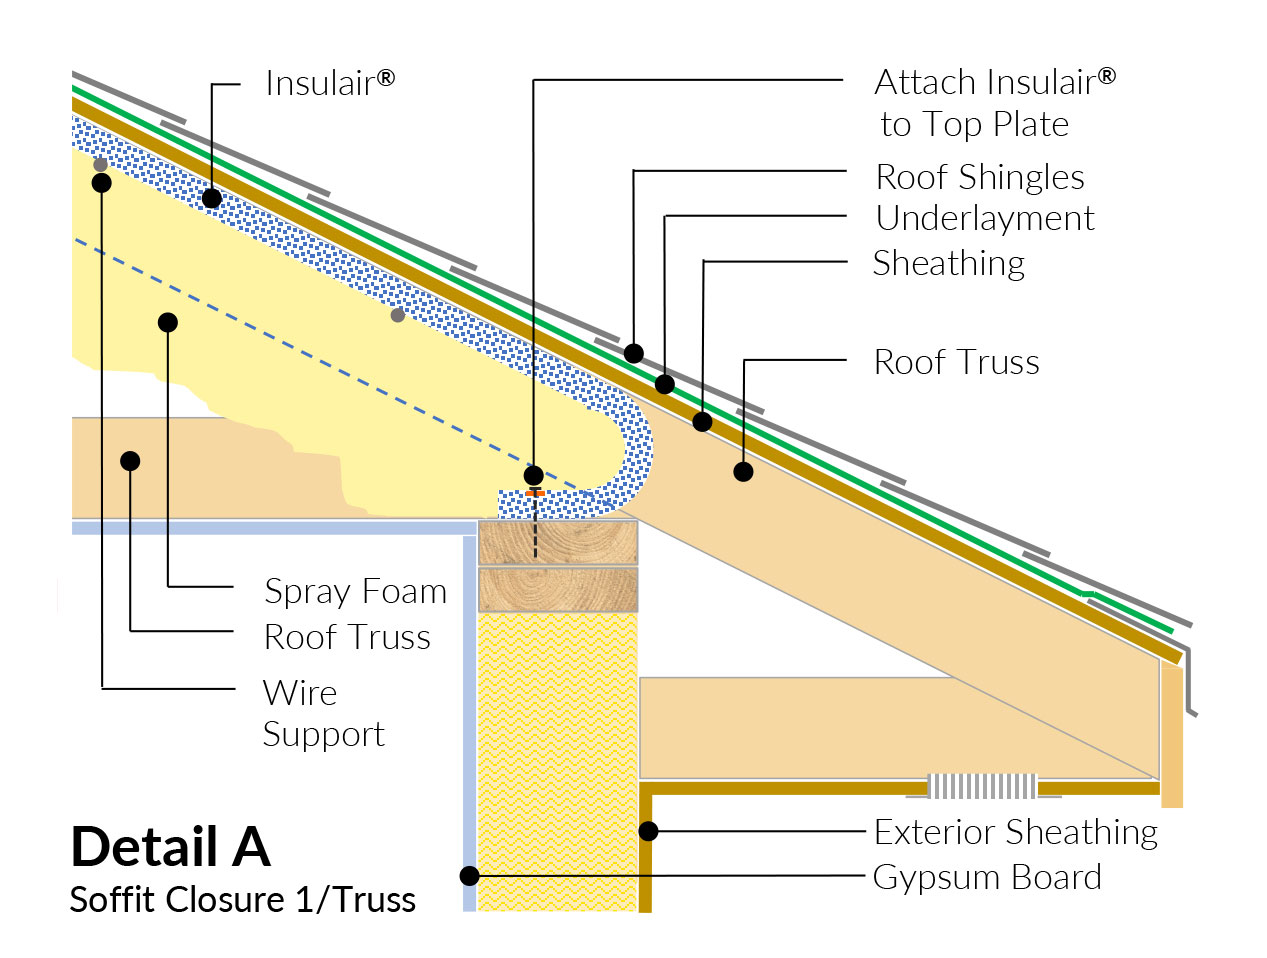
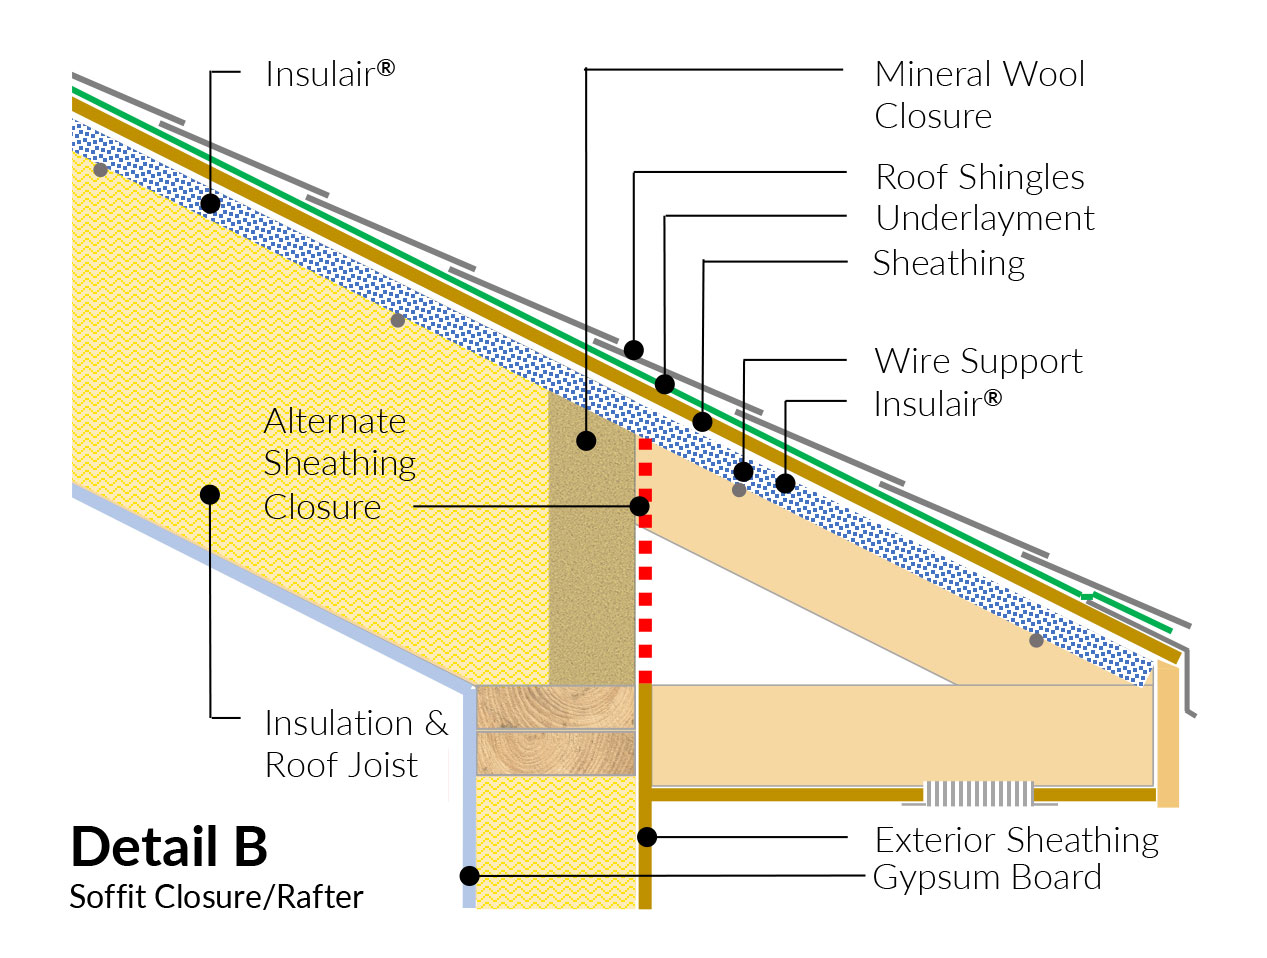
Choose the proper size of Insulair® for your application. The Insulair®14.5” is recommended for rafters spaced at 16” O.C. The Insulair® 22.5” is recommended for rafters spaced at 24” O.C.
Step 1
Attach Insulair® to the roof plate near the soffit with the filter fabric facing toward the interior and the entangled filament against the roof deck. Run it up the underside of the roof deck and bend it into a “U” at the roof plate to create an end dam that supports foam adhesion, maintains airflow, and reduces wind washing. To prevent foam from blowing between each course of Insulair® attach an additional layer of blocking fabric, or insulation blocking.
Alternatively, you can minimize wind washing by blocking off the area between the roof plate and underside of the roof deck at soffit locations with either mineral wool, or by extending the wall sheathing.
Step 2
Unroll Insulair® from the eaves up towards the ridge. Place the support wires approximately 12” apart below the Insulair® fabric with a friction fit created between the two roof rafters. This will keep the Insulair® snug to the underside of the roof deck.
Alternatively, you can mechanically fasten Insulair®; however, take precaution that the staple or nail length will not penetrate entirely through the roof deck.
Step 3
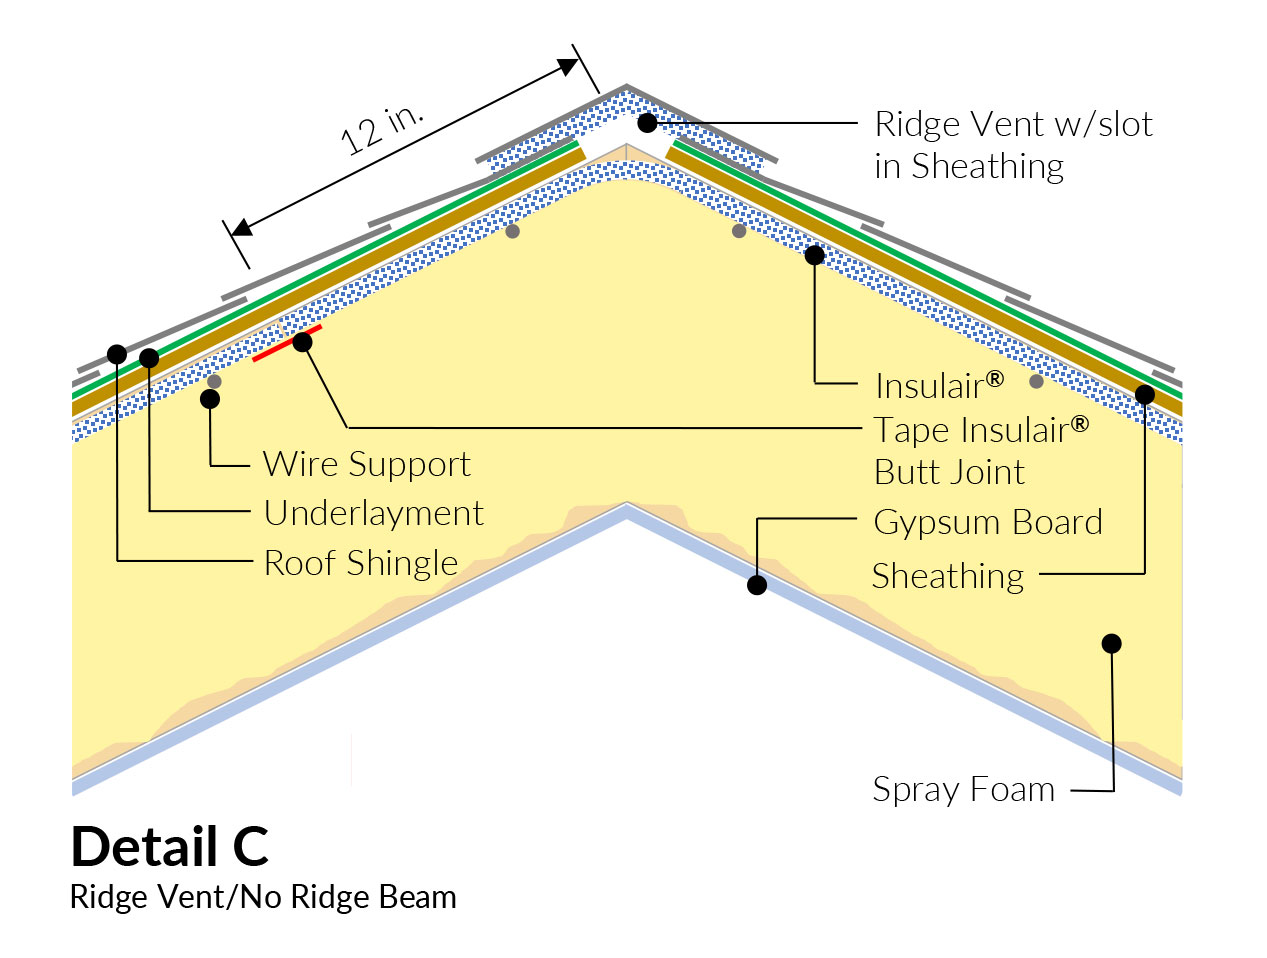
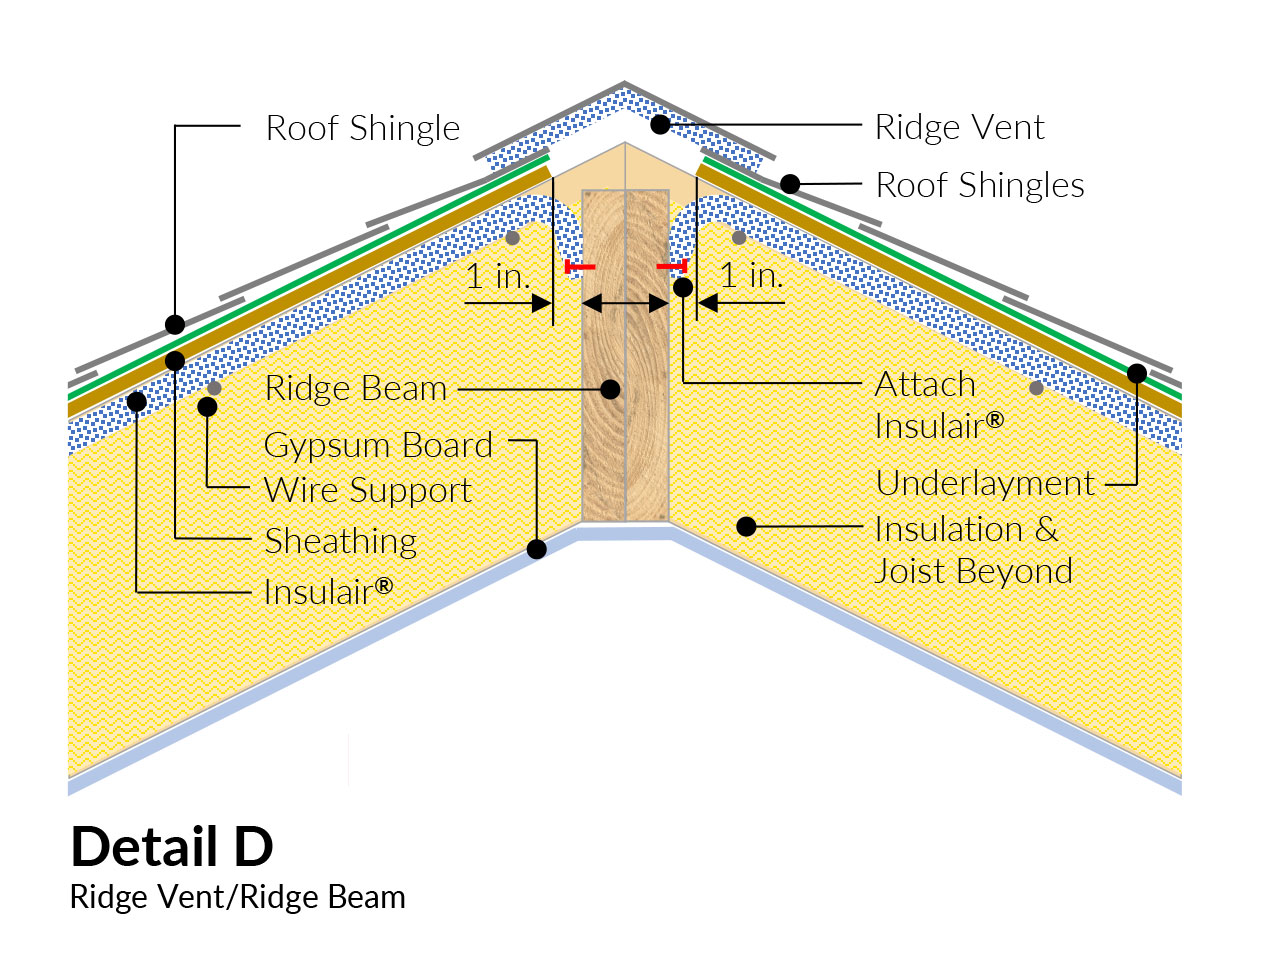
Run Insulair® against the underside of the ridge location and down the other side of the roof deck for a continuous installation.
When a ridge beam is present, fold the Insulair® so it runs down the ridge board a few inches and attach with staples or nails. Again, be sure the fabric is facing outward to avoid spray foam from being able to get into the ventilation space created by Insulair® at the ridge vent location.
Additional Considerations
In any condition that requires an end-to-end butt joint of the Insulair® material, tape the joint for all spray foam applications. Tape with flashing tape or duct tape to prevent spray foam intrusion that would block the ventilation space.
Install plywood roof sheathing onto rafters. Install roofing felt or ice dam protection membrane over sheathing. Check local codes and manufacturer’s recommendations for specific requirements.
Install R-Vent® over roofing felt, ice protection membrane, and metal edge flashing or drip edge. Ensure R-Vent® material is installed flush against edge of the flashing or drip edge. Carefully trim the R-Vent® material at all penetrations with a utility knife or scissors.
When installing metal or alternate material shingles, unroll R-Vent® horizontally just ahead of the shingles as they are installed. Tack or nail R-Vent® in place every three square feet. Do not overlap the R-Vent® material. Butt each course tightly against the previous course and at vertical seams.
When installing vertical metal roofing panels, unroll R-Vent® vertically from ridge to eave just ahead of the metal panels as they are installed. Tack or nail R-Vent® in place every three square feet. Do not overlap the R-Vent® material. Butt each course tightly against the previous course and at vertical seams.
At ridge locations, extend R-Vent® material over the ridge and butt against the material on the opposite side of the roof. If a ridge vent is utilized, follow the ridge vent manufacturer’s recommendations for underlayment material installation.
Apply roofing materials using manufacturer’s recommended fasteners and instructions, allowing for the additional thickness of the R-Vent® material.
Install 16 inches on center for proper moisture drainage.
Install weep vents as part of masonry wall construction and in accordance with manufacturer’s installation instructions.
Coordinate with installation of through wall flashings.
Locate weep vents at [wall bases, above door and window openings, above bond beams, and other through wall flashings.] [At locations detailed on Drawings.]
Space at 24” o.c maximum.
Embed weep vents in vertical mortar head joints. Tool joints to prevent obstruction of weep spouts.
- Install composite drainage mats in accordance with manufacturer’s instructions at locations indicated on the Drawings.
- Install composite drainage mats:
- To allow flow of water in all directions within drainage core.
- To prevent soil from entering drainage core while providing ample flow of water.
- Secure composite drainage mats to surfaces with termination bars in accordance with manufacturer’s instructions.
- Butt composite drainage mats together without overlapping.
- Overlap the fabric flap for sealing adjacent composite drainage mats to prevent soil intrusion at joints.
Protect installed composite drainage mats from damage during construction.
Be sure to run the Advanced Drain over the positive drain pipe.
This video explains the proper installation techniques for our Green Roof Products;
Advanced Drain (Formerly known as Watairvent Green Roof), Ground Guard RR and Ground Guard VM.
Install green roof drainage mats in accordance with manufacturer’s instructions at locations indicated on the Drawings.
Install green roof drainage mats to allow unobstructed water and air flow.
Butt green roof drainage mats together without overlapping.
Protect installed green roof drainage mats from damage during construction.
This video explains the proper installation techniques for our Green Roof Products;
Advanced Drain (Formerly known as Watairvent Green Roof), GroundGuard® RR and GroundGuard® VM.
Install green roof drainage mats in accordance with manufacturer’s instructions at locations indicated on the Drawings.
Install root reinforcement mats to allow permanent securing of plant roots in soil.
Butt green roof drainage mats together without overlapping.
Protect installed green roof drainage mats from damage during construction.
This video explains the proper installation techniques for our Green Roof Products;
Advanced Drain (Formerly known as Watairvent Green Roof), GroundGuard® RR and GroundGuard® VM.
Install green roof growing mats in accordance with manufacturer’s instructions at locations indicated on the Drawings.
Install green roof growing mats to allow permanent securing of plant roots in soil.
Butt green roof growing mats together without overlapping.
Protect installed green roof growing mats from damage during construction.
- Unroll RAM Vent® along the perimeter of the footings on top of the soil.
- Lay a cross piece of RAM Vent® through the center parallel to the longest wall every 15 to 20 feet. Then, overlay the subfloor with a vapor barrier extending up the wall.
- Cut a 3” (8cm) hole in the vapor barrier near the most appropriate corner. Next, glue a 4” (10cm) flanged riser pipe with a detachable cap to the vapor barrier and sitting on top of RAM Vent™ (The pipe stub should be long enough to extend above the top of where the slab is poured). Then, pour the slab. Finally, extend the vent pipe through the roof.
Additional Instruction — Make sure to seal any cracks/ seams etc. on top of the concrete with a sealant, such as silicone.